
Self-tanner splotches on elbows and knees are problematic because the skin is thicker, drier, and has more folds, which result in it soaking up and holding on to more of the colorant being slathered on than elsewhere. It is these patchy or streaky results that are so frequently seen from uneven DHA (dihydroxyacetone, the active ingredient in most self-tanners) absorption.
To get an even glow, you need to do more than simply follow generic application tips — you need to understand the unique biology of your skin’s joints and then find ways to work with it.
- Typical Tip-Offs: You’ll see shadows of murky veils on the kneecap or elbow tip, or sharp contrast lines where tan abruptly stops and starts, or a crackly texture from pigments clinging to dry skin.
- Root of the Problem: The central problem is one of structure. The skin over joints has a thicker top layer (stratum corneum) and makes less natural oil, leaving a dry surface that sucks up self-tanner.
- Key Mitigation: Success hinges on a two-part strategy: meticulous skin preparation to normalize the surface and modified application techniques that deliberately use less product on these high-absorption zones.
Struggling with uneven skin texture? See: Rough Bumps on Back of Arms: A Guide to Keratosis Pilaris.
The Anatomy of Elbow and Knee Skin
To effectively prevent streaks, it helps to understand why the skin on your elbows and knees behaves differently. This isn’t a flaw in your technique but a matter of skin biology.
| Skin Characteristic | Elbow & Knee Skin | Skin on Arms & Legs |
|---|---|---|
| Skin Thickness & Texture | Thicker stratum corneum; more friction and folding. | Relatively thinner and smoother. |
| Natural Hydration | Fewer oil glands; tends to be drier. | Better natural lubrication. |
| Cell Turnover | Slower; dead skin cells accumulate more readily. | More regular exfoliation. |
| Product Absorption | Highly absorbent; grabs and holds color. | More even, predictable absorption. |
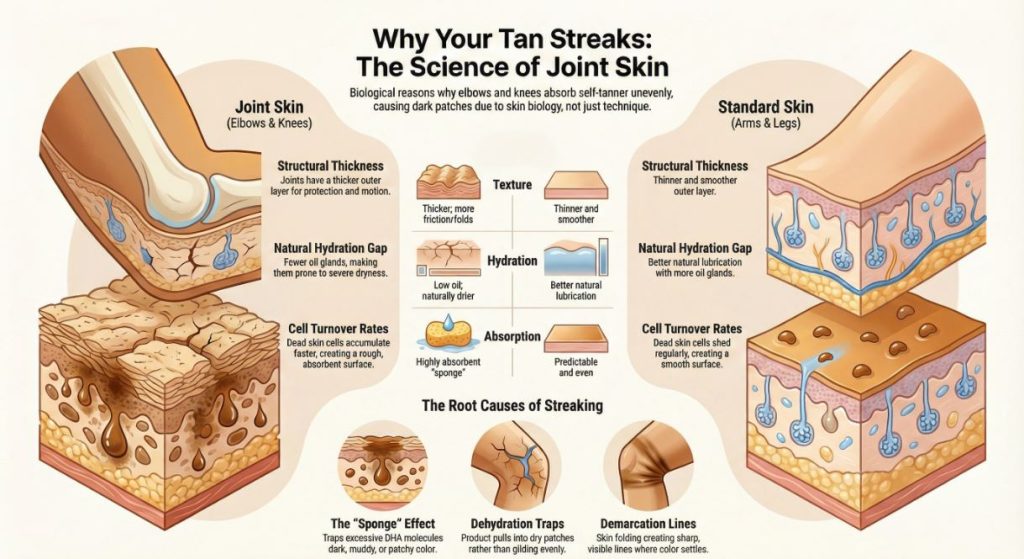
Thicker Skin and Sloughing:
The skin covering your joints is naturally thicker to provide protection and allow for a wide range of motion. This area also experiences constant bending and friction, which can cause the outer layer of dead skin cells to build up. When you apply self-tanner, this rough, textured surface acts like a sponge, trapping more DHA and developing an excessively dark color. Furthermore, this thicker skin sheds its cells at a different, often slower, rate than the skin on your calves or forearms. As your tan fades, these patches may remain darker longer, creating unevenness.
Lack of Natural Hydration:
But while the skin on your cheeks or forehead has an abundance of sebaceous (oil) glands, that’s not true for your elbows and knees. They have no natural sebum, which leaves them highly susceptible to dryness! Dehydrated skin does not have a flattenable, agreeable surface. If you apply DHA, it doesn’t spread out evenly; the compound winds up in the driest patches and hence darkens intensely there without blending much with undamaged skin.
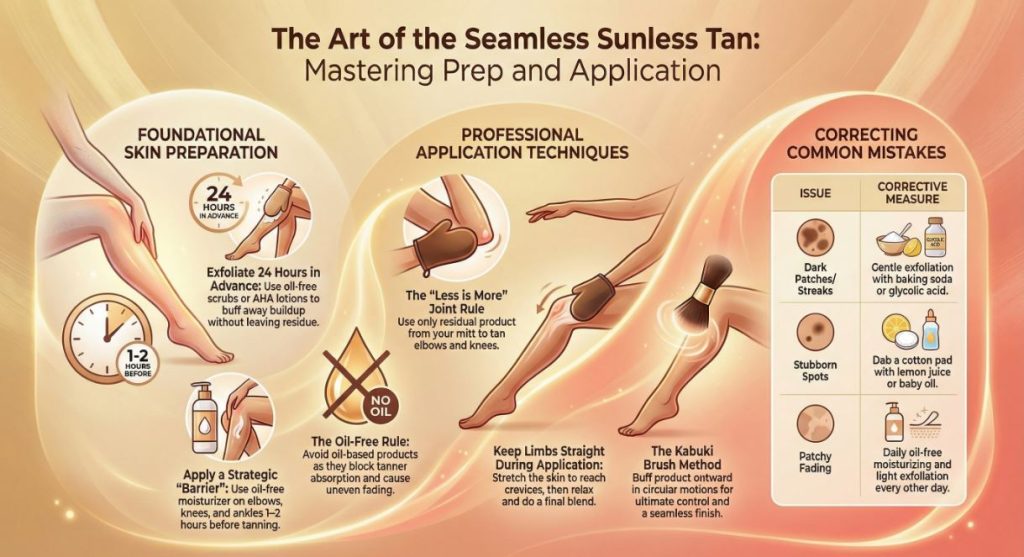
A Proactive Approach: Preparation and Application
Avoiding streaks is overwhelmingly a proactive endeavor. The steps you take before the tanner touches your skin are the most critical for an even result. For more on loose or crepey skin, check out: Understanding Loose Stomach Skin: Causes & Care Options.
Foundational Skin Preparation
- Exfoliate with Precision: 24 hours prior, exfoliate Exfoliating 24 hours before you tan is non-negotiable. Concentrate on the elbow and knee areas with a gentle scrub, exfoliating glove, or chemical exfoliant (such as an AHA body lotion) to slough away that thick buildup of dead cells. The objective here is to create a smooth, even canvas — not to irritate the skin. Skip oil-based scrubs, which can leave behind a residue that tanner can’t soak in.
- Moisturize Strategically (The “Barrier” Method): Before your tan in the 2-3 days prior to your tanning session, be sure to hydrate thoroughly by using a good moisturiser all over your body. Apply a light, oil-free moisturizer to your elbows, knees, ankles, and heels 1-2 hours before applying self-tanner—or use a barrier cream. These thirsty cells are the ones that absorb self-tanner rapidly and don’t leave enough to create an even glow. This thin layer of conditioning cream makes sure the driest cells get just how they need while simultaneously creating a barrier so the self-tanner has time to develop evenly. Be certain that your skin is dry and no oily film remains prior to moving on to tanning.
Specialized Application Techniques for Joints
The golden rule for elbows and knees is: less is more. These areas should be treated with the leftover product from your mitt, not a fresh application.
- The Dry Mitt Blend Method: This is a highly recommended technique. After you have tanned your entire arm or leg using a tanning mitt, do not apply more product. Instead, take your now-almost-dry mitt and use it to gently buff and blend over the elbow or knee in circular motions. The minimal residual tanner on the mitt is the perfect amount for these areas.
- The Kabuki Brush Technique: For maximum control, apply your powder with a dense flat top kabuki brush. Either apply your tanner directly onto the brush (using VERY little) or use what’s left on your mitt when you’re done and work into each area of the face. Buff the product out in circular motions from the center of your elbow or knee, feathering it into the already-tanned skin around it.
- Mind Your Posture: When applying, keep your limbs straight. Bending your elbow or knee stretches the skin, making the crevices and lines more accessible. Apply the product while the skin is stretched, then relax your limb and do a final blend to ensure color doesn’t pool in the folds.
Corrective Measures and Even Fading
Even with the best preparation, you might notice some unevenness after development. Correcting these spots requires a gentle, targeted approach to avoid making the problem worse.
Addressing Dark Patches and Streaks
If your elbows or knees have developed too dark:
- Gentle Exfoliation: In the shower, use a gentle exfoliating glove or a paste of baking soda and water on the dark patches. A body scrub with glycolic acid can also help break down the stained cells more effectively. Be patient—gentle exfoliation over a day or two is better than harsh scrubbing that can create red, patchy skin.
- Targeted Lemon Juice or Oil: For a small, stubborn patch, a cotton pad with a small amount of lemon juice (the citric acid acts as a bleaching agent) or baby oil (to break down the DHA) can be dabbed on the area. Always follow with moisturizer, as these methods can be drying.
Ensuring Your Tan Fades Gracefully
A tan that fades evenly is just as important as one that applies evenly. To prevent your elbows and knees from turning patchy as the color lightens:
- You also need to keep your skin hydrated: Moisturize Every Day. Well-hydrated skin will slough off color evenly. 7) Use a moisturizer that is without oil twice or more daily on the entire body. Oils can break down DHA, leading to faster, uneven fading.
- Start with light Exfoliation: On day three after your first tan, start very lightly exfoliating every other shower. This helps fade the color and keeps it from going blotchy or patchy by not letting dead, tan-stained cells accumulate.
Related summer skin concern: Why Thigh Chafing Gets Worse in Summer & How to Manage It
Understanding When to Seek Professional Guidance
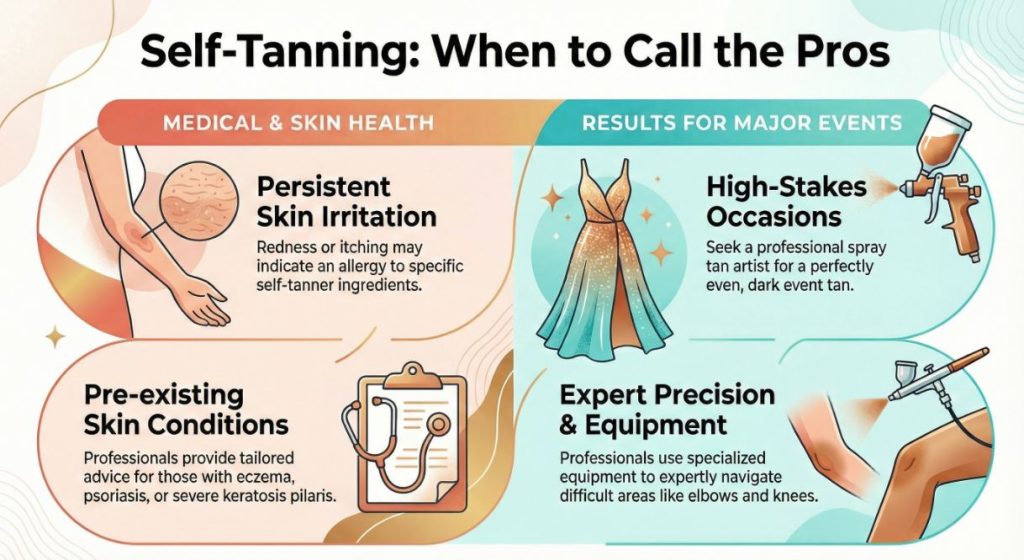
While most self-tanner streaks are a cosmetic issue you can manage at home, consider a professional consultation if:
- You have ongoing skin irritation, redness, or itching after applying self-tanner – this can be a sign of an allergy or sensitivity to one of the ingredients.
- You have a pre-existing skin condition (such as eczema, psoriasis, and or very severe keratosis pilaris ) on your joints that makes exfoliation and application difficult, and you need tailored advice.
- You want a sheer, whole-body tan for a big occasion. A skilled spray tan artist knows how to carefully negotiate their way around elbows and knees.
For these situations, consulting a licensed esthetician or a dermatologist can provide you with tailored, safe recommendations for your specific skin type and concerns.
Frequently Asked Questions
Not if done correctly. The goal of a barrier cream is to normalize absorption, not block it entirely. A light layer allows some color to develop, so your knees match the shade of your legs rather than turning several shades darker. Using the “dry mitt” method over the moisturized area ensures a seamless blend.
Skipping them often creates an obvious, unnatural line where the tan stops. The goal is a graduated, blended color. Using a minuscule amount of product—via the dry mitt or brush methods—ensures the joints have a warmed, sun-kissed hint of color that matches the overall glow.
If you have chronically dry skin, extend your prep time. For a week before tanning, moisturize your entire body daily, paying extra attention to joints. The night before, apply a thicker, oil-free moisturizer or hydrating mask to your elbows and knees and wear long sleeves/pants to bed. This intensive pre-hydration can dramatically improve the surface texture.
Look for chemical exfoliants like body lotions that contain Glycolic Acid (an AHA) and/or Salicylic Acid (a BHA). Glycolic acid is great at melting away the “glue” that binds dead skin cells to your skin, whereas salicylic acid can penetrate deep into your pores and follicles, which can be beneficial if you suffer from bumpy skin or keratosis pilaris on your arms.
Final Recommendations
The trick to not ending up with streaky self-tanned elbows and knees isn’t simply finding the perfect product but understanding and working with the unique landscape on your skin. The trick is to respect the fact that these thicker, drier patches exist and not try to eradicate them with reckless aggression – an incisive exfoliation here, bitch-slap of soothing moisturiser there. Instead, by thinking more about an outline that paves the way to unlimited results, you stop focusing as much on covering the skin with color and dating yourself and start concentrating on preparing its surface.
Disclaimer: This story is for informational purposes only, and is not a substitute for professional medical advice. Patch test new skincare on a small area of skin, and if you have personal skin concerns speak with your dermatologist.